

It is time for another Daring Bakers challenge. This is my second challenge and wow what a challenge it was. I made this over two days on a weekend. I think the key to making this cake is breaking it up so it is not overwhelming.
Note: This cake calls for Filberts but I used hazelnuts. The hazelnut is supposed to be similar to a filbert
Filbert Genoise
- 1 recipe sugar syrup, flavored with dark rum
- 1 recipe Praline Buttercream½ cup heavy cream, whipped to soft peaks
- 1 recipe Strawberry Peach Glaze
- 1 recipe Ganache Glaze, prepared just before using 3 tablespoons filberts, toasted and coarsely chopped
The first thing I did was put the hazelnuts in the over at 275 Degrees and they stayed in the oven for 20 minutes. After 20 minutes I poured them into a kitchen towel and rubbed them till the skin came off . I didn't get pictures of them peeled because this took a while to do. I think next time I would roast for 30 minutes.

Filbert Genoise
1 ½ cups hazelnuts, toasted/skinned
2/3 cup cake flour, unsifted
2 Tbsp. cornstarch
7 large egg yolks1 cup sugar, divided into ¼ & ¾ cups
1 tsp. vanilla extract
½ tsp. grated lemon rind
5 lg. egg whites
¼ cup warm, clarified butter (100 – 110 degrees)


Put the yolks in the bowl of an electric mixer, with the whisk attachment, and beat until thick and light in color, about 3-4 minutes on med-high speed. Slowly, add ¾ cup of sugar. It is best to do so by adding a tablespoon at a time, taking about 3 minutes for this step. When finished, the mixture should be ribbony. Blend in the vanilla and grated lemon rind. Remove and set aside.

Place egg whites in a large, clean bowl of the electric mixer with the whisk attachment and beat on medium speed, until soft peaks. Increase to med-high speed and slowly add the remaining ¼ cup of sugar, over 15-20 seconds or so. Continue to beat for another ½ minute. Add the yolk mixture to the whites and whisk for 1 minute.

For the Clarified butter I heated the butter slowly on the stove and then separated the solids. Below is the solids and clarified butter.


Pour the warm butter in a liquid measure cup (or a spouted container). * It must be a deep bottom bowl and work must be fast.* Put the nut meal in a mesh strainer (or use your hand – working quickly) and sprinkle it in about 2 tablespoons at a time – folding it carefully for about 40 folds. Be sure to exclude any large chunks/pieces of nuts. Again, work quickly and carefully as to not deflate the mixture. When all but about 2 Tbsp. of nut meal remain, quickly and steadily pour the warm butter over the batter. Then, with the remaining nut meal, fold the batter to incorporate, about 13 or so folds.


With a rubber spatula, transfer the batter into the prepared pan, smoothing the surface with the spatula or back of a spoon. **If collected butter remains at the bottom of the bowl, do not add it to the batter! It will impede the cake rising while baking.

Tap the pan on the counter to remove air bubbles and bake in the preheated oven for 30-35 minutes. You’ll know the cake is done when it is springy to the touch and it separates itself from the side of the pan. Remove from oven and allow to stand for 5 minutes. Invert onto a cake rack sprayed with nonstick coating, removing the pan. Cool the cake completely.


*If not using the cake right away, wrap thoroughly in plastic wrap, then in a plastic bag, then in the refrigerator for up to 3 days. If freezing, wrap in foil, then the bag and use within 2-3 months.
Sugar Syrup
Makes 1 cup, good for one 10-inch cake – split into 3 layers
1 cup water
¼ cup sugar
2 Tbsp. dark rum
In a small, yet heavy saucepan, bring the water and sugar to a boil and simmer for 5 minutes. Remove from heat, add the liqueur. Cool slightly before using on the cake. *Can be made in advance.
1 recipe Swiss Buttercream
1/3 cup praline paste
1 ½ - 2 Tbsp. Jamaican rum (optional)
Praline Paste
1 cup (4 ½ oz.) Hazelnuts, toasted/skinless
2/3 cup Sugar
Line a jelly roll pan with parchment and lightly butter.
Put the sugar in a heavy 10-inch skillet. Heat on low flame for about 10-20 min until the sugar melts around the edges. Do not stir the sugar. Swirl the pan if necessary to prevent the melted sugar from burning. Brush the sides of the pan with water to remove sugar crystals. If the sugar in the center does not melt, stir briefly. When the sugar is completely melted and caramel in color, remove from heat. Stir in the nuts with a wooden spoon and separate the clusters. Return to low heat and stir to coat the nuts on all sides. Cook until the mixture starts to bubble. **Remember – extremely hot mixture.** Then onto the parchment lined sheet and spread as evenly as possible.
As it cools, it will harden into brittle. Break the candied nuts into pieces and place them in the food processor. Pulse into a medium-fine crunch or process until the brittle turns into a powder. To make paste, process for several minutes. Store in an airtight container and store in a cook dry place. Do not refrigerate.


Blend ½ cup buttercream into the paste, then add to the remaining buttercream. Whip briefly on med-low speed to combine. Blend in rum.
Swiss Buttercream
4 lg. egg whites
¾ cup sugar
1 ½ cups (3 sticks) unsalted butter, slightly firm
1 ½ -2 Tbsp. Chambord or liqueur of your choice
1 tsp. vanilla
Place the egg whites in a lg/ bowl of a electric mixer and beat with the whisk attachment until the whites are foamy and they begin to thicken (just before the soft peak stage). Set the bowl over a saucepan filled with about 2 inches of simmering water, making sure the bowl is not touching the water. Then, whisk in the sugar by adding 1-2 tablespoon of sugar at a time over a minutes time. Continue beating 2-3 minutes or until the whites are warm (about 120 degrees) and the sugar is dissolved. The mixture should look thick and like whipped marshmallows.
Remove from pan and with either the paddle or whisk attachment, beat the egg whites and sugar on med-high until its a thick, cool meringue – about 5-7 minutes. *Do not over beat*. Set aside.
Place the butter in a separate clean mixing bowl and, using the paddle attachment, cream the butter at medium speed for 40-60 seconds, or until smooth and creamy. *Do not over beat or the butter will become toooooo soft.*

On med-low speed, blend the meringue into the butter, about 1-2 Tbsp. at a time, over 1 minute. Add the liqueur and vanilla and mix for 30-45 seconds longer, until thick and creamy.

Refrigerate 10-15 minutes before using.
Refrigerate in an airtight container for up to 5 days, or can be frozen for up to 6 months. If freezing, store in 2 16-oz. plastic containers and thaw in the refrigerator overnight or at room temperature for several hours.
Troubleshooting the buttercream.
- Wait! My buttercream won’t come together! Reheat the buttercream briefly over simmering water for about 5 seconds, stirring with a wooden spoon. Be careful and do not over beat. The mixture will look broken with some liquid at the bottom of the bowl. Return the bowl to the mixer and whip on medium speed just until the cream comes back together.
- Wait! My buttercream is too soft! Chill the buttercream in the refrigerator for about 10 minutes and rewhip. If that doesn’t work, cream an additional 2-4 Tbsp. of butter in a small bowl– making sure the butter is not as soft as the original amount, so make sure is cool and smooth. On low speed, quickly add the creamed butter to the buttercream, 1 Tbsp. at a time.
I had both of these problems with my buttercream but I didn't give up and it finally came together. At first it was going great but when I added the vanilla and chambord it broke but I just put it back over the hot water and it came back together. But then it was to loose so it went into the fridge. Then I rewhipped it and it worked. It can be a long process but it is worth it because of the taste.
Strawberry Peach Glaze2/3 cup thick strawberry peach preserve (or whatever you like)
1 Tbsp. water

Remove from heat and, using a strainer, press the mixture through the mesh and discard any remnants. With a pastry brush, apply the glaze onto the cake while the cake is still warm. If the glaze is too thick, thin to a preferred consistency with drops of water.

Ganache Glaze
Makes about 1 cup, enough to cover the top and sides of a 9 or 10 inch layer or tube cake
6 oz. Semisweet or Bittersweet chocolate
3/4 cup heavy cream
1 tbsp. light corn syrup
Break the chocolate into 1-inch pieces and place in the basket of a food processor and pulse until finely chopped. Transfer into a medium sized bowl and set aside.

Heat the cream and corn syrup in a saucepan, on low, until it reached a gentle boil. Once to the gently boil, immediately and carefully pour over the chocolate. Leave it alone for one minute, then slowly stir and mix the chocolate and cream together until the chocolate is melted and incorporated into the cream. Carefully blend in vanilla mixture. If the surface seems oily, add ½ - 1 tsp hot water. The glaze will thicken, but should still be pourable. If it doesn’t thicken, refrigerate for about 5 minutes, but make sure it doesn’t get too cold!


*Ganache can take on many forms. While warm – great fudge sauce. While cool or lukewarm – semisweet glaze. Slightly chilled – can be whipped into a filling/frosting. Cold & solid – the base of candied chocolate truffles.
Assembling Cake

Cut a cardboard disk slightly smaller than the cake. Divide the cake into 3 layers and place the first layer top-side down on the disk. Using a pastry brush, moisten the layer with 3-4 Tbsp. of warm sugar syrup. Measure out 1 cup of praline buttercream and set aside.


Spread the bottom layer with a ¼-inch thickness of the remaining buttercream. Cover with ½ of the whipped cream, leaving ¼-inch border around the edge of the cake. Place the middle layer over the first, brush with sugar syrup, spreading with buttercream. Cover with the remaining whipped cream.


Place a rack over a large shallow pan to catch the ganache drippings. Remove the gateau from the refrigerator and put it the rack. With a metal spatula in hand, and holding the saucepan about 10 inches above the cake, pour the ganache onto the cake’s center. Move the spatula over the top of the ganache about 4 times to get a smooth and mirror-like appearance. The ganache should cover the top and run down the sides of the cake. When the ganache has been poured and is coating the cake, lift one side of the rack and bang it once on the counter to help spread the ganache evenly and break any air bubbles. (Work fast before setting starts.) Patch any bare spots on the sides with a smaller spatula, but do not touch the top after the “bang”. Let the cake stand at least 15 minutes to set after glazing.


To garnish the cake, fit a 12 – 14-inch pastry bag with a #114 large leaf tip. Fill the bag with the reserved praline cream. Stating ½ inch from the outer edge of the cake, position the pastry tube at a 90 degree angle with the top almost touching the top of the cake.
Craig got me a great gift before I started this cake a mechanical pastry bag. I was so excited to use this. I need a lot more practice but it was a lot of fun!

Refrigerate uncovered for 3-4 hours to allow the cake to set. Remove the cake from the refrigerator at least 3 hours before serving.


Leftover cake can be covered with foil and kept in the refrigerator for up to 5 days.
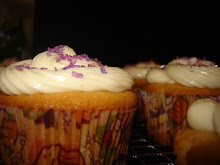
Craig gave the cake 1 thumb up which means the cake was delicious. Craig teased me and said "Its not a good looking cake but it tastes delicious" Note - It was my first time piping and I think it turned out pretty well.


We both loved the cake it is so great. I would make this again but it would have to be a VERY special occasion.


34 comments:
Hi!
I like the way you decorated your cake. It looks marvelous!
I had troubles trying to pipe frosting in a straight line.
Also, thanks for the DB greeting on my blog. :-)
Great job! I agree, this is a special occasion cake...
I too agree, very very special occasion haha, you did a wonderful job!
Special Occasion? It would have to be REALLY special for me to put this much time and effort in again. Great job on the cake, I like your decoration.
glad you enjoyed the cake. strawberry peach sounds yummy.
Wow--this cake has a great texture. So smooth.
Your piping is fine. Don't be so hard on yourself. :D
I agree: this is definitely a special occasion cake.
Good job.
I agree, great job for this being the first time you piped decorations! The ganache looks really good.
Christina ~ She Runs, She Eats
wow - so many good photos! Congrats. Thanks for stopping by and saying hello.
Your cake looks good and the free form piping looks pretty.
Yes, the cake was really good.
Hi Ruth!
Your cake looks scrumptious and I love how you took photos of each step.
It was my fisrt DB challenge. I had trouble doing my decorative frosting as I did not have a big leaf tip and it was so hot in NY the day I made it the buttercream was weepy, but I was very happy with how the cake turned out and tasted.
It's nice to meet another NEW YORK DB! Thanks for your commnet.
this is unbelievable! you have become soooo the domestic goddess.
and i love hazelnuts so i think it was a good switch.
maybe you can give me some pointers the next time i bake ;)
amazing hob ruthie!
Nice work, very creative decorating.
Funny now that you mention the filbert/hazelnut thing, I think I only ever see filberts in their shell at Christmas.
This did take quite some time, didn't it! Great job, and even better that it was loved!
I like your decoration is like a celtic knot with heart :)
WOW, love your step by step directions. Your cake looks neat, the layers are so well cut. Great post!
Gosh, you really documented that ;-) Totally agree about breaking it into steps - I did it over a whole month, and had a lot of fun!!
Your cake looks great and I like all the pictures. I get so wrapped up in the process I forget to take pictures of every step.
Thanks for your comments! Your cake is cute too. I love the little heart that you put on yours!
I'm amazed at how much attention you Daring Bakers put into the challenges!! To actually record all the steps leading to the final product!! And cool syringe too!! I wish I had one..
It was a bit of a marathon to make the cake but a thumbs up is great feed back.
Great job on the challenge! Love the thumn up!
You took so many photos! I'm impressed. If I took that many photos as I was baking I'd never get the cake finished.
I think you did a great job piping and it looked great, but best of all you got the thumbs up of approval.
Great step by step pictures - I especially like the brittle one!
hey ruth! Well done on your cake too! I love all the step by step photos and the final verdict of the taster! Looks scrummy!
Nice step-by-step pictures and nice buttercream work!
Thanks for the comment it was a fun first challenge. Looking forward to next months!
For a first time decorating, you did wonderful. . .WoW! I loved this cake too! Great job =D and awesome pictures
We loved the cake as well. Such a special treat!
I too give you 1 thumb-up!!! Very nice job, I love the step-by-step photo chronicle. That is a great assist to anyone about to attempt this one.
Congrats!!!!!
Oh my gosh, what a great job you did documenting your cake baking experience. That picture of the "thumbs up" is a perfect ending to your blog-umentary.
Nice work!
The second picture totally looks like a ship. I want to stick a little action figure on top and sing Celine Dion songs. Of course I'd have to stop drinking after that....
Ooo, Strawberry Peach Glaze. That alone is amazing. Your cake looks great.
We are June baking buddies, I started last month also. Your cake looks wonderful and I think your photos are so helpful, I could have used them while making this cake. And Craig is a great happy addition. Congratulations.
I must admit this cake was delicious, but boy was it hard work. Well done, your cake looks fabulous!
Post a Comment